April 29, 2021

Why did my Pellet Stove Stop Feeding Pellets? 2 Common Reasons to Fix/Replace a Bad Thermocouple

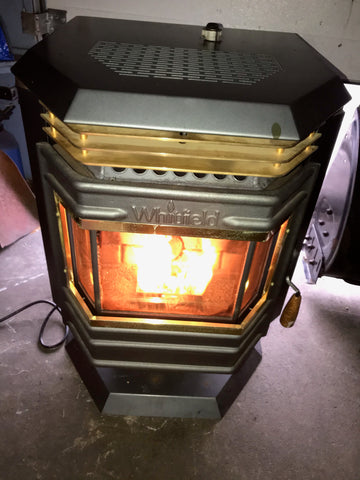
If your stove is not feeding pellets within 15 mins, you may need to replace the thermocouple. However check the thermostat screw terminals on the stove to make sure they are tight. If not then when the stove warms up and the heat expands the connection then the connection can open and also cause the stove to shut down.

Thermocouple failure is common in Quadra-Fire pellet stoves. The thermocouple acts as a proof of fire, which means it senses the heat from the flame in the firepot. You may still see a flame, but the thermocouple won't sense it. (If there's no flame and the igniter isn't warm, it is a bad igniter.) If it doesn't sense heat 15 minutes after the stove turns on, it will stop the auger from feeding pellets and it will stop the stove for safety reasons. Make sure your stove and venting is clean and the fire door and ash pan gaskets are good, creating a tight seal. Also, check to see if there are pellets in the hopper. If it did run out of pellets then hit the reset a few times to fill the auger chute and see if they start dropping. If you've checked all these things and the snap discs and vacuum switches are good, then usually it is most likely a bad thermocouple.  

Quadra-fire Thermocouple for Pellet Stove
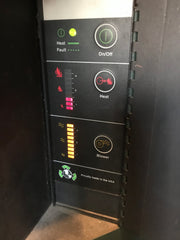
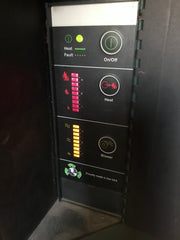
Look for what Quadra-fire calls the amber colored light on the clear control box of newer pellet stoves. It is a yellowish color. This indicates a thermocouple error.  After the stove is turned on, the blue light will flash, then the amber light will flash 3 times.The older gray control box does not have the amber error light.

See video of thermocouple error light:
Quadrafire CB1200 not starting - Control Box Amber light Blinks 3 times not feeding pellets - YouTube

There are basically 2 possible reasons why your thermocouple may be bad. Here's what to check:

1. If the stove does not fire up after the blinking yellow light or after you've determined pellets are not dropping and you confirmed it isn't the igniter, this means that the thermocouple is somehow disconnected from the control box. The horseshoe connectors that slip under the black screw terminal block are loose or broken, or the wire itself is severed. It is also possible that the connectors inside the metal box that protrude out of the back of the black terminal block have a bad connection. Unplug them and plug them back in to check. Breaks often happen inside the thermocouple cover from the intense heat from the fire. Remove the cover to check.


2. If the stove does fire up and will not continue to run but can be made to run by pressing the reset button and it feeds more pellets. This is still a bad thermocouple but the wire is neither severed nor disconnected, so there is no 3 flashes of the amber light on newer stoves.
First make sure the end of the thermocouple is pushed all the way into the thermocouple cover.

If that is the problem, you can find the upgraded thermocouple bracket here to fix it:
Quadrafire Thermocouple upgraded Bracket with set screw - 812-3171 | East Coast Hearth

If that does not keep the pellets feeding after firing it up then replace the thermocouple.
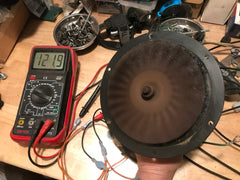
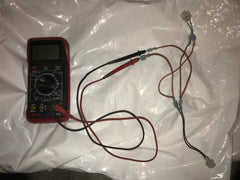
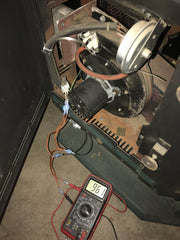
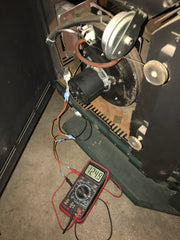
The best way to test this thermocouple is to measure the voltage:
This K type thermocouple voltage changes 40 uV per degree C. In startup mode, the green light turns on at about 2.7 mV (+/- 0.5mV) which indicates startup mode; the red light turns on at about 12.0 mV (+/- 1 mV) to indicate run mode. Therefore in run mode a good flame of 1,000 Deg C should read about 30mv. If you read anywhere from 12 mv to 30 mv then you are in the ballpark. If it reads less than 12 mv with a good flame, then it should be replaced.

You can find the thermocouple here:

34-3/4" long for large FS stoves - see model #s in link below
Quadra-Fire Thermocouple. 34 3/4 in long- 812-0210 | East Coast Hearth

14" long for smaller stoves - see model #s in link below
Quadra-Fire Thermocouple. 14 in long- 812-4470 | East Coast Hearth

Replacing the thermocouple:

1. Loosen the 2 screws on the terminal block and removing the leads.
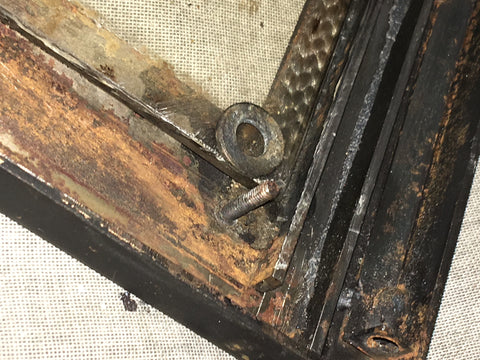
2. In the firepot loosen the bolt on the thermocouple bracket, remove the white thermocouple cover, and push the thermocouple wire down through the hole in the fire box and out the side.
3. If the brand new thermocouple does not work, try reversing the leads where it is connected to the terminal block. The wiring on some stoves may vary, so you'll have to switch the leads.

Now you know everything you need to know to fix a broken thermocouple and get those pellets dropping again.

February 25, 2021

How to Detect a Bad Pellet Stove Low Limit/ POF (Proof of Fire) Switch, Clean, Lubricate and Make it Last Longer

Sometimes your stove starts up but then after several minutes, the fire dies. This is because the auger motor stopped turning and your stove failed to go into run mode. Typically your stove will go into run mode 15-20 minutes after the is stove turned on. If it doesn't start up within this time frame, it usually means the igniter isn't working, causing the low limit switch not to detect a flame, the low limit switch itself isn't working therefore not detecting a fire, or there are no pellets in the hopper. If there are pellets in the hopper and the igniter is hot, then the problem could be a bad snap disc. The Low Limit Snap Disc also known as the Proof of Fire ( POF ) Switch typically serves two purposes:

  1. Activate the Convection (Room) Blower to heat the room. This takes air from the back of the stove and sends it through the heat exchanger tubes to blow heated air out the front of the stove.
  1. To tell the control panel to switch from startup mode to run mode, which means fire has started and the stove is heating .The typical low limit switch is Closed on Rise (or Normally Open, N/O) and the trip point is 120 or 140 degrees, thus the switch closes the circuit at these temperatures. This is what tells the stove to switch to run mode. The newer HHT as well as the old Danson's Pelpro, Glow, and Cheap Charlie pellet stoves are the exception. These switches are Normally Closed (Open on Rise.) In this case when the switch gets hot and opens, the stove switches to run mode. Knowing this is crucial for testing the switch.


Testing the Low Limit/ POF Switch for Proper Operation

There are 3 ways this Snap Disc can fail.

  1. The Bimetalic disc does not open or close the circuit.

This is most likely to be the problem so it's best to start here. This problem occurs if no heat from the fire is present to bend the Bimetalic switch and close the contacts or open the contacts in the case of a Pelpro Pellet Stove.

         Troubleshooting

You can make a male to male jumper to bypass this switch temporarily to see if the stove continues to run with no error # 3 light. Attach to male spade lugs available at Home Depot, Lowes or any big box store and crimp them onto the a wire at least a few inches long. I use the stranded 18 gauge wire and blue insulated spade lugs so they don't short out. Blue lugs indicate the correct size to use. I recommend Tyco brand. They plug in to all other types of quick disconnects. Some brands will not. You should unplug the stove before performing this test. Even so this test uses electricity so you must be careful not to touch the wires to the body of the stove or they can short out potentially causing damage to the stove. On St. Croix Pellet Stoves, this jumper must only be inserted 60 seconds after the on button is pushed so the diagnostic startup test will still pass.

        Bench Testing

This is how you bench test a Normally Open/ Close On Rise Snap Disc. See Video below. Note: For Normally Closed/ Close on Rise Low Limit Switches, the switch will open when heated.

   a. Put the low limit snap disc in a vice or holder that is heat resistant

   b. To make it easier to connect an ohm meter or continuity tester, cut a set of meter leads, then crimp on male and female quick disconnects or spade lugs. Now it is easy to unclip the meter lead tips and clip the females to the Low Limit. If the low Limit has screw terminals, then prepare 2 wires with male clips on one end, stripping the other end to fasten under the screws.

  c. Connect the meter leads to the low limit snap disc.

  d. Set the multi-meter meter to ohms

  e. Heat the low limit switch until a click is heard which means the switch has closed

  f. The meter should read zero ohms (If it does not read zero ohms, then see number 2 below)

The video in the link below shows how to test a Low Limit or POF Safety Switch that stops power going to the auger that feeds pellets and shuts the stove down within the startup period of approximately 15-20 mins.

Pellet Stove Low Limit POF (Proof of Fire) Testing Video

  1. The Contacts in the switch that complete the circuit are corroded or worn causing excessive resistance.

If the first test passes, then you'll want to test this next while you're still bench testing. This happens due to excessive oxidation and old age. The corrosion or wear is on the inside, so to see if this is the problem you will also need to use a barbecue lighter and multi-meter for this test. The Low Limit Switch also called POF (Proof of Fire) is located next to the exhaust blower or on the plenum that contains the hot exhaust.  In a Whitfield stove that I worked on, the old switch closed when the stove heated, which is unusual because it typically won't close if it isn't working. I further tested it by igniting a barbecue lighter under the switch. I heard a click, and it closed again. There had to be something else wrong like the switch was worn or corroded. I used a multi-meter and discovered that the switch was more resistive, measuring 0.3 to 0.4 ohms when the switch was closed, when it should have read zero. So the contacts must have been worn. The switch and the stove stopped running because the voltage going through the switch was too low.

A brand new or good switch does measure resistance when heat first closes the switch but usually settles down to 0.0 ohms or 0.1 at the most. The voltage sent through the switch must be high enough to trigger the circuit to allow the stove to go to run mode from the initial start up mode and continue operating properly.


  1. The switch mounting is not making good metal to metal contact.

If it is neither of the first two problems, the switch is good, but the metal of the switch is not making good contact with the metal of the exhaust blower. In that case, the Heat Level # 3 light will start flashing when the pellet stove fire dies out. This can be caused by loose screws or a bad white gasket underneath. There should not be a gasket on the switch and it should be removed. The loose screws can be removed and can be replaced with #10 self tappers to assure a snug tight metal to metal connection. You can add thermal paste or a piece of aluminum foil for an even better metal to metal connection. Dielectric grease can be used for the wire connections. In St. Croix Stoves the low switch is mounted on a more rounded surface, which can cause this problem.

  1. Cleaning and Lubricating the Snap Disc for the Best Operation

Even when your snap disc is working well, there are things to maintain it and make it work even better.

  a. The snap disc can be removed by unclipping or unscrewing the 2 wires and then removing the 2 screws. It can be cleaned with Acetone and a paper towel or cloth. 

   b. There are 2 types of compounds for improved operation:
      i. Thermal Paste also known as Heat Sink Compound which is sold as Super Lube at Home Depot.This helps transfer the heat from the stove to the snap disc to trigger the bimetalic switch to turn on the convection blower and activate run mode.


      ii. Dielectric grease to insure the best electrical connection and prevent terminal oxidation or corrosion


November 15, 2020

Replace Your Pellet Stove Door Gasket in 6 Simple Steps Ensuring a Proper Seal and a Warm, Cozy Home

For optimum stove performance it is crucial to ensure a tight seal when you install the fire door gasket in your pellet stove. If it is not sealed properly, problems associated with air leaks such as vacuum error and a lazy flame could occur. Vacuum errors may prevent your pellet stove from starting up. Some pellet stoves, especially newer stoves, will display vacuum errors on your control panel. A pellet stove with a properly sealed door gasket will have a lively dancing flame, but a stove with an improperly installed gasket will not have a robust flame, the flame more still. I refer to this as a lazy flame and the stove will not heat your house as effectively. I always use a high quality graphite gasket when servicing pellet stoves and for my own stove at home. The reason I do not use the less expensive white gaskets is that sometimes they cause the door to stick to the stove due to a lack of lubrication. One of these came installed in one of my customers stoves and she could not open the fire door for cleaning. Here are some simple steps to properly install a fire door gasket in your wood pellet stove, ensuring a proper seal.

1. First employ the dollar bill test to see if you need to replace the gasket. Insert a dollar bill on the top of the door and then try to pull it out. If you can pull it out, it fails the test and you need a new gasket. Try this again on the bottom and the sides.
2. Pull off the old gasket, then using a drill with a wire wheel, remove all the old cement or silicone.
3. Apply new high temp orange or clear silicone. I prefer the clear silicone for looks.
4. Press in the new gasket and then cut length to ensure it comes out to the right length. If you try cutting without pressing it in first, the length won't be accurate enough.
5. Close the door and open it, then wipe off excess silicone.
6. Close the door and let it cure for an hour or so.

I've heard that some people wet the gasket prior to install. I don't recommend it. I don't think it would be good for the curing process. You may also want to replace the door glass gasket as well. In most stoves this must be done before installing the door rope gasket. Most pellet stoves use 11/16 inch wide flat tape gasket. Graphite impregnated recommended.

That's it! Your home will be warm and cozy.

April 09, 2020

What to Check When Your Pellet Stove Fire Door Gets Sooty Very Quickly


So you've recently cleaned your pellet stove thoroughly and your damper is set correctly, but your pellet stove's fire door is dirty and covered in soot. You have to verify that you have proper airflow through the stove. One of the first things you need to check is that the ash pan or ash door is shut properly. In one of the stoves I serviced, a Lennox Whitfield Optima 3, one of the latches on the ash pan was unlatched, which caused the problem. Next you should replace the stove's gaskets if you haven't recently. Door gaskets, exhaust blower gaskets, and pan ash pan/as door gaskets need to be replaced to ensure a proper seal and airflow. They should be replaced about every three years.

If that isn't the issue, then the problem lies with the exhaust blower or control panel. First check if the exhaust blower may be weak. If the exhaust blower fan isn't spinning fast enough, it won't provide enough air to keep the glass clean or ignite the pellets. If that is not the issue, then the control board could also need replacement. The issue may be that the control board does not send proper voltage to the exhaust blower for making the blower run at the proper speeds for each heat level.

Before testing whether the exhaust blower is weak or not receiving proper voltage, it is necessary to clean the blower itself. If the blower is dirty, it may not run properly. To clean and lubricate the blower thoroughly, follow these steps:

1. Clean the blades with a wire wheel and use a putty knife underneath the impeller blades. Optionally, you can use white aluminum oxide blasting to further clean the blades.

Dirty Exhaust Blower  Clean Blower with Wire Wheel  white aluminum oxide blasting   Cleaned Exhaust Blower

2. Lubricate the blades with dry moly.


3. Lubricate the motor shaft and bearings with Marvel Mystery oil or synthetic bearing oil.

Lubrication Hole on Exhaust Blower

Now you may test to see if the exhaust blower is weak:

Remove the exhaust blower to clean and lubricate and do the spin test. Without any voltage applied to the motor, spin the fan blades with your hands. If it slows down gradually, it passes the test, but it stops abruptly, the bearings in the motors are bad and the motor needs to replaced.
Click here to see video on exhaust blowing spin test

 f that is not the issue, then many stoves change the speed of the exhaust blower for each heat level. To test if the control board is sending the correct voltage to the exhaust blower for making the blower run at the proper speeds for each heat level, follow these steps:

1.  Start with a bench test.
121.9 VAC is the proper amount for the voltage coming out of the wall. Apply that voltage to the exhaust blower on the bench to assure the blower is working properly at full speed. After plugging the test cord into the wall, if the blades freeze and you hear a hum, that means the windings that form the magnet have broken down and the motor is bad and the exhaust blower needs to be replaced.

Bench testing

2. If that is not the issue, then perform a speed test inside the wood pellet stove. Using a Y style testing jumper, install the exhaust blower back into the stove,
then connect a digital voltage meter into the same plug so the voltages sent to the exhaust blower can be seen on the readout. The molex connectors should be removed and the wires should then be connected to the stove with spade clips for most stoves except Whitfield.

VAC meter with connectors

VAC meter with Connectors

Note: During the startup cycle, the exhaust blower voltage remains the same, so you may not start the test until the run cycle begins.

If the blower is weak, then it could result a in lack of proper airlflow and the igniter will not ignite the pellets.

3. Press the heat level buttons on the control panel and see if the voltage reads properly for each heat level. Consult your owners manual or service manual for the proper voltages.

By measuring the voltage of a good working stove of the same make and model as your own you can also come up with the correct voltages. If the voltages are not like the ones shown on a working stove or in the owners or service manual, then the control panel will have to be replaced.

There are three heat levels for newer Whitfield stoves. By testing a good stove, I retrieved these numbers. Here is a picture of the stove I tested.

Whitfield Optima 3 Pellet Stove under test

1. Low Heat Level - Blower Voltage from Control Panel = 96.1 VAC

Low Heat Level  Voltage from Control Panel
2. Medium Heat Level - Blower Voltage from Control Panel = 113.5 VAC

Medium Heat Level 
3. High Heat Level - Blower Voltage from Control Panel = 124.8 VAC

High Heat Level  High Heat Level

Summary of newer Whitfield exhaust blower voltages with 3 Heat levels.

Bench Test -  121.9 VAC - When plugged into a 120 VAC outlet
Heat Level 1 - 96.1 VAC - Low Heat
Heat Level 2 - 113.5 VAC - Medium Heat
Heat Level 3 - 124.8 VAC - High Heat


I also have the correct voltages for older Whitfield Wood Pellet Stoves with 5 Heat Levels:

Heat Level 1 - 70 VAC
Heat Level 2 - 76 VAC
Heat Level 3 - 79 VAC
Heat Level 4 - 85 VAC
Heat Level 5 - 107 VAC

December 17, 2019

What do I do if my pellet stove does not light up? 3 Key Causes You Should Look For

When your auto light pellet stove does not fire up, there can be many reasons and from my years of experience here is what I have found.

1. The igniter is Bad

The first thing that may come to mind is the igniter, after all it lights the pellets. This is easy to test but some tests may not reveal it is the problem.  It's helpful to know if the igniter tests bad, but occasionally the the igniter could have a good reading and still be bad.The igniter should read approx 50 ohms on an ohm meter. It should also read approximately 2 to 3 amps on a current meter.
I came across one instance where an igniter I tested read 47 ohms, a proper reading, but in the stove, it was causing the 6 amp control panel fuse to blow. When I plugged it into an AC outlet, the igniter smoked and one of the wires burned off, so I knew that igniter was bad. I have also seen cases in some stoves, especially ones with 400 watt igniters, where the igniter is weak and cannot light the pellets.

I came across one instance where an igniter I tested read 47 ohms, a proper reading, but in the stove, it was causing the 6 amp control panel fuse to blow. When I plugged it into an AC outlet, the igniter smoked and one of the wires burned off, so I knew that igniter was bad. I have also seen cases in some stoves, especially ones with 400 watt igniters, where the igniter is weak and cannot light the pellets.

2. Poor/ Limited Airflow Throughout the Stove
However, the igniter is often not the reason why the stove doesn't light. Another common cause is not enough air flowing through the stove to light the pellets.
    
Check for Blockage
You may start by checking the air inlet pipe and the outside air kit for blockages, but these are not the most easily clogged areas. Focus in on any blockages inside the stove down wind from the burn pot. This includes behind the baffles, inside the air chambers leading to the exhaust blower,
and the exhaust venting. Start by brushing all areas to loosen up the blockage. Then use an air compressor to clear the fire box and a leaf blower to suck out the exhaust pipe. Reaching those areas is crucial.

Check for Birds Nest
A birds nest trapped in the venting may also obstruct the airflow needed for ignition. This is common on installations where the exhaust venting termination cap is approximately 20 feet off the ground at bird height.
A preventative bird cap termination can be installed to completely alleviate this issue.https://www.eastcoasthearth.com/products/duravent-pellet-vent-pro-round-horizontal-termination-cap-pellet-vent-with-bird-screen?_pos=1&_sid=1149333ae&_ss=r

Check Exhaust/Combustion Blower and Control Board
If the exhaust or combustion blower is not spinning that would also limit airflow and may need replacement. Check this blower by plugging it into the AC wall outlet directly.
If the combustion blower works but does not come on right as the stove is turned on, then the control panel is suspect and may need replacement.

3. Pellets are Damp or Moist
After checking the other possibilities and finding the stove still won't light, then the issue may be damp pellets. If the pellets are damp or moist, they will not ignite. Always keep pellets in a dry place in your home. For pellets to ignite, there must be 35 parts air to 1 part fuel and the fuel must be low in moisture. When the wood or corn pellets are stored for an extended period, they may absorb moisture during a humid summer if stored in a damp basement or outside. Pellets that have damage with extreme moisture crumble and turn to mush, but sometimes they are not noticeably damp, but it is enough to prevent pellets from lighting.To help determine whether moist pellets are the issue, light the pellets manually with starting gel or hand sanitizer and see if the stove runs properly
Note: Corn has a much higher flash temperature than pellets so a 500 or 600 watt igniter and air pump is used in well designed multi-fuel stoves for this purpose. Other multi-fuel stoves state to use wood pellets for ignition.

Summary
 A bad igniter is commonly the reason why the stove doesn't light, but. not always. Running the proper tests will help determine the issue. The key issues that prevent a stove from lighting are moist pellets, a bad igniter, or poor airflow. Always store pellets in a dry place away from moisture or humidity. Check for blockages and birds nests that may prevent airflow. A combustion blower that won't spin or a faulty control board can also affect airflow. Having your stove professionally cleaned once or twice a year can help maintain proper airflow.

October 12, 2018

Which Burn Pot Liner is Correct for my Enviro Pellet Stove?

Buying pellet stove parts online is convenient. Just type "Enviro" and "burn pot liner." A quick search can find you just what you need.

But your search might return multiple results. Enviro EF2 burn pot liner, Enviro Maxx Burn pot liner, Enviro Windsor burn pot liner. You see a bunch of part numbers. You think to yourself, " I know I have an Enviro stove, but I'm not sure which model." This happens often. We've known customers who move into a new home that comes with a pellet stove, but the former owner doesn't tell them what their stove model is.

Do not go by just what the burn pot looks like in the photo. Some Enviro burn pots look similar, but come in different sizes.

If you have the stove manual, that's a great start. Often, those have a parts list or at the very least, they will tell you what model stove you have. All of our parts listings on East Coast Hearth state the stove model, so for example, if you know you are looking for a burn pot for Enviro Meridian, then you're all set.

But lets say, you don't have a manual. Getting a used stove can be a great value and it gives a great pellet stove a new home, but often the new stove owner doesn't receive a manual. The first place to check for the stove model is the back of the pellet stove. It also may be found underneath the hopper lid.

Occasionally, on an older stove, the lettering on the stove might be worn or hard to read. If you can't figure out which model Enviro stove you have, please contact customerservice@eastcoasthearth.com. We'd be happy to help. If you attach pictures of the front of the stove and the control panel, we can identify the model for you and send a link to the correct burn pot to order. You may also measure the dimensions of the burn pot and email them if you wish. We've serviced many Enviro stoves, so we've seen them all.

We've included a chart of burn pots liners, part numbers, and the stove models they fit below. Remember, some Enviro stove models have similar looking burn pot liners, but they are NOT identical. They cannot be used to substitute for each other. Make sure you identify the stove model or ask us. You may click on the pictures and part numbers to view product pages. Many of our product pages show the Enviro burn pot dimensions.


 Picture of Enviro Burn Pot Enviro Part Number Stove Models They Fit
High Ash Enviro Burn Pot Liner 50-587 50-258

50-587

Enviro Pellet Stoves:

  • EF2
  • EF3
  • Meridian
  • Windsor

Vistaflame Pellet Stove:

  • VF 100

Hudson River

  • Chatham
  • Davenport
  • Kinderhook
Enviro Omega Fire Pot/Burn Pot Liner 50-1693

50-1693

Enviro Omega
Enviro EF5 SS Burn Fire Pot Liner High Ash- 50-961

50-961

Enviro EF5 Evolution
Enviro Empress FS Burn Pot/Firepot Liner 50-1365

50-1365

Enviro Empress FS
Enviro Maxx Vista Flame VF170 Burn Fire Pot Liner

50-1662

  • Enviro Maxx
  • Vistaflame VF170
Enviro Vista Flame M55 VF55 SS Burn Fire pot Liner 50-2042

50-2042

  • Enviro M55
  • Vistflame VF55
Steel Burn Pot Liner Enviro EF4i-024 EF4 Solus

EF4i-024

  • Enviro EF4
  • Solus
Enviro Mini-A Burn Pot Liner - 50-1923

50-1923

  • Mini-A
  • Mini (if Upgragded with a Mini A burn pot)


September 06, 2018

How Fire Brick Insullates the Stove, Reducing Harmful Emissions & Producing Optimum Heat

The fire brick found in the back of the firebox of most wood and pellet stoves serves an important purpose. Fire brick helps optimize the stove's heat output and produces a cleaner burn, benefiting the environment. In many stoves fire brick also ensures proper heat flow. The fire brick insulates the heat inside the stove, reflecting the heat off the boards instead of letting it get absorbed by the stove walls. This increases the temperature inside the stove which transfers more heat through the heat exchanger so more heat comes out the front. This helps keep your room toasty.

For some pellet stoves, it is an intricate part of the design. Whitfield stoves for example, have an exhaust chamber behind the firewall where hot exhaust smoke travels. The fire brick encloses this chamber. Because the fire chamber doesn't have a wall of its own, the fire brick is an absolute must for the exhaust air to flow properly behind it. Without the fire brick, hot exhaust smoke would come back inside the firebox and not be channeled properly to the exhaust blower and venting.

The way fire brick insulates heat also reduces harmful emissions, benefiting the environment. It is actually one of the key reasons fire brick was developed. Back in the early 1970's there weren't any restrictions on emissions from wood or pellet stoves. That changed in 1988 when the EPA established
emissions standards. Engineers discovered that in order to achieve a cleaner burn, it was necessary to put firebrick in the combustion chamber to make it hotter. This insulates the heat inside the firebox, making it hot. Ideally, it creates a temperature of over 1000F. This burns more harmful particles in the smoke such as hydrocarbons so they are not released into the air.

Designing an area inside wood or pellet stoves that maintains sufficient heat for complete combustion required engineers to improve how stoves are insulated. Baffle boards and blanket insulation were invented for this purpose. Baffle boards are a type of rigid insulation such as fire brick, whereas Blanket Insulation is soft insulation behind the firewall in the back of the stove or behind a metal plate in the back of the firebox. Fire brick baffle boards have the benefit of not having to be installed behind something. They stand on their own, better deflecting heat off the stove walls. They can be made to look like real brick, which creates, a warm homey look.

Secondary combustion is when more warm air is introduced into an already high temperature zone or secondary chamber of the stove. Usually, the hot air comes through a combustor into the secondary chamber. Many modern wood stove manufacturers use catalytic combustors because they burn smoke at low temperatures, releasing chemicals to burn the smoke better, but most pellet stove manufacturers achieve a cleaner burn through higher combustion temperatures.  For pellet stoves it is not necessary to use a catalytic combustor because pellets do not include tree bark, so those impurities don't have to be removed.

Baffle boards or Firebrick were originally constructed of cast iron or actual brick, but these materials did not provide sufficient insulation to reach the high temperature required to achieve a
clean burn. Vermiculite based fiber insulating boards were then designed into many stoves. Now many stoves use ceramic boards.
Ceramic fiber boards can be used with stoves with fire temperatures as high as 2200F.

We sell the OEM as well as durable after market Fire-Tek fire brick
https://www.eastcoasthearth.com/search?q=Fire-Tek

Superwool fiber for baffle boards is a customizable fire brick alternative if you have an older stove with discontinued parts or your stove didn't come with fire brick and you'd like to maximize combustion. It is available in different thicknesses, and can be custom cut. It has low bio-persistence and can with stand high heat like ceramic boards. There are examples of proper use in the link blow in the product pictures.
https://www.eastcoasthearth.com/search?q=superwool

May 06, 2017

Upgrading & Rebuilding your Breckwell Pellet Stove Convection/Room Blower


Recently, while rebuilding the Convection Blower in a Breckwell pellet stove, I discovered a more durable, higher torque motor. The Blower kit has a more durable 1.75 amp motor and is the same speed of 3,000 RPMs same as the original blower to and produces the same 120 CFM. This smoother ball bearing motor is built to last longer. I’ve put together a rebuild kit that comes with everything you need for upgrading to this motor.

Breckwell Convection Blower

https://www.eastcoasthearth.com/products/breckwell-convection-room-blower-rebuild-upgrade-kit-for-newer-a-e-33a-oem-blowers

The stove originally has an open frame motor attached to the black squirrel cage housing with three stud bolts. Closed frame motors, where the magnet and windings are concealed in a round black case, cannot be rebuilt in this manner. See picture of old open frame motor below.

Breckwell RoomBlower

To install this kit just do the following:

Remove the old blower from the stove by unclipping the motor power wires and removing the bolts that hold the blower flange and old flange gasket in the stove.

  1. 1.Remove 3 metal screws over squirrel cage impeller and remove ring.
    Spray old motor shaft with PB blaster. Remove squirrel cage set screw with Torqx T20 driver and remove squirrel cage applying even pressure under cage with a screw driver or small pry bar.
    3. Remove 3 motor nuts and remove old motor and shaft.
    4. Clean blower housing and install new parts from kit in reverse order.
    5. Use new high temperature silicone gasket when mounting blower assembly in pellet stove and plug in power wires. Connect green wire under stove bolt or nut for proper grounding.

Breckwell Convection Room Blower  Breckwell Room Convection Blower

The new motor and squirrel cage delivers warm room air while running quietly. It comes with a reusable silicone mounting gasket, which reduces vibration, making the motor even quieter.

Convection Room Blower Breckwell

May 06, 2017

Cleaning Your Breckwell Airwash Baffle Keeps the Fire Door Window Clean


Recently, I rebuilt an older Breckwell P22. It’s a super efficient unit that puts out a lot of heat for it's size. This stove is still being made and it’s known as the Maverick P22. The glass can get sooty pretty easily, so I removed the airwash baffle on the firedoor. The baffle directs the incoming fresh air so that it flows against the inside of the firedoor glass, pushing the internal smoky air away. This keeps the window cleaner. I found quite a bit of ash build up as you can see in the photos below. On the low heat levels there is less air,so the ash drops into the baffle, thus decreasing the amount of fresh air flow even more. To clean the baffle, I take a wire brush or a wire wheel on my drill driver and scrape it clean. To remove the remaining rust and residue you can use acetone on a rag. To prevent this, I recommend cleaning the baffle once or twice per year. I recommend using Rutland White-Off to clean the glass.

Pic 1 - P22 fire door

Fire Door Pellet Stove

Pic 2 - Fire Door inside

Fire Door Pellet Stove

Pic 3 - I removed the 2 nuts holding airwash baffle and removed the airwash baffle plate. You can see the ash build up.

Fire Door Pellet Stove

Pic 4 -  Closeup of ash build up.

Fire Door Pellet Stove

Pic 5 - Dirty marks on the glass caused by clogged air wash baffle.

Fire Door Pellet Stove

Pic 6 - Closeup shows that the there’s no gasket along the bottom of the glass, which allows air in from the outside in front of the glass, keeping it clean. The gasket should only be installed along the top and sides. Also, a washer in each bottom corner of the glass creates a gap between the baffle and the glass,allowing fresh air inside, thus keeping the inside of the firedoor glass clean, even while the stove is running. Keeping the airwash baffle clean, will help keep this gap open, providing proper airflow.

Fire Door Pellet Stove

Pic 7. - I used White-Off glass cleaner to clean the glass.

Fire Door Pellet Stove


Pic. 8- Tools to Clean Air Wash Baffle and Glass. Use the sockets to remove the air wash baffle. A scraper can be used to remove any remaining hardened ash. Silicone is used for for installing gaskets. The tape can be used to seal the caulking gun so it doesn't dry out.

Tools For Door Glass

Pic 9- Newly Installed Door and Glass Gasket. If the door gasket is old and worn, you won't have a good seal and it will lead to airflow problems and the airwash baffle will not work properly. It is recommended to replace it about every three years or so depending on how often you use the stove.

Installed Door and Glass Gasket Breckwell

Link to view and purchase silicone tube:

https://www.eastcoasthearth.com/collections/stove-maintenance-care/products/high-heat-silicone-sealant-caulk-pellet-stove-door-gaskets-500-deg-rtv-rutland-clear-rt76ct

Link to view and purchase silicone cartridge:

https://www.eastcoasthearth.com/collections/stove-maintenance-care/products/high-heat-silicone-sealant-caulk-pellet-stove-door-gaskets-500-deg-rtv-rutland-clear

 Link to view and purchase door gasket:

https://www.eastcoasthearth.com/collections/breckwell-pellet-stove-parts/products/breckwell-fire-door-hi-quality-graphite-impregnated-5-8-rope-gaskey-8-long

 Link to view and purchase glass gasket:

https://www.eastcoasthearth.com/collections/breckwell-pellet-stove-parts/products/firedoor-glass-ash-pan-graphite-flat-gasket-1-8-d-x-11-16-wide-x-8-long-self-stick-for-breckwell


August 26, 2014

Door, Ash Pan, Glass, Hopper Lid Rope Gasket Maintenance & Why I Recommend Graphite Gaskets


I have replaced many rope gaskets while servicing stoves. These gaskets are important for keeping a pellet stove air tight for a lively flame and maximum heat. From my experience, after 3 or 4 years, these rope gaskets become frayed or hard and brittle and need replacement. These rope gaskets are used on the Fire Door, Ash Pan, Window Glass, and Hopper Lid. Round rope gasket is used for fire box doors and some ash pan doors. Door rope gaskets come in different diameters from 3/8" on Harman pellet stoves to 7/8" on large Travis stoves. These gaskets prevent room air from being sucked into the fire box. If they are not doing their job, the flame becomes lazy and won't provide as much heat. Flat rope gasket is used for ash pans, ash doors, hopper lids, and window glass. I always recommend premium quality graphite impregnated rope gaskets for best results. Here's why.

 I installed a brand new pellet stove using my prior experiences. I even watched an installation DVD to make sure I knew all the requirements for that specific stove. However, after a few days my customer called because the fire door was jammed. I had not expected this. I went back to figure out what happened. Using my screw driver, I carefully pried the fire door open. I had to try different angles before it finally budged. I found the standard white rope gasket that comes already installed on the door may stick and cause a door jam. The pellet stove I installed was brand new and I had not altered the door gasket in any way. Graphite impregnated gaskets won't cause this problem. Graphite is slick, which keeps the door from sticking. Since the graphite gasket won't stick, it won't get frayed from sticking to the door as it is opened and closed over time. For this reason, graphite gaskets last longer and may not need to be replaced as often. I still recommend to check them as you perform regular maintenance of course. See below for instructions on how to replace the door gasket.

You can find a graphite gasket for your stove by clicking here

It is also important to replace hopper lid and ash pan gaskets regularly. Hopper lid gaskets take flat rope gaskets often called Tape Gaskets. Hopper lid gaskets prevent air from being sucked into the hopper that could feed a hopper fire in a burn back situation. This problem is not common, but it can happen so it is best to take the necessary safety precautions. Check your hopper gasket if you have one and make sure it is not frayed, worn, hard, or brittle. If so then replace them.


Ash pan gaskets also use flat tape or flat rope gaskets. Some ash pans are open to the fire box, so a good seal is necessary to ensure a lively flame. A dollar bill test can be employed to check the door and ash pan gaskets. Open the door and lie a dollar bill across the gasket and latch the door shut. If you can still pull the bill out, this indicates a poor seal. This test should be repeated for all 4 sides of the door. Sometimes, the latch can be adjusted so the door shuts tighter. If the test still fails then the gasket should be changed.


Some flat gaskets come with tape that peels off the back. These can be used for replacing the window glass gaskets. They don't need to be replaced quite as often, but they do get frayed so they should be checked occasionally to ensure the fire door window glass is tightly sealed. If the glass breaks, they should be replaced along with the glass.


The door gasket can be replaced with just a few simple steps:

1. Pull out the old gasket. You can pry it with a screw driver if stuck.
2. Remove all glue and residue remaining from the old gasket with a wire brush or a wire wheel on your Dremel or drill driver.
3. Apply RTV high temperature silicone to the channel where new gasket will be installed. I prefer the way clear silicone looks..
4. Start laying in the new gasket. I prefer starting from the bottom corner on the side since it cannot be seen easily. Some manufacturers say to start in the middle, but from my experience the corner works best.
5. Close the door and latch it until it dries so the silicone sets up properly. You may also close the door on newspaper to ensure the silicone will not glue the door shut! I prefer to close the door and latch it, then open the door and wipe any excess silicone. This ensures the door will not be glued shut and is more professional because excess silicone stuck to newspaper is messy and difficult to clean up.


Always check your rope gaskets once a year for an optimum flame and safer heating season.